Welcome to the ultimate beginner’s guide to Canva! Whether you are an entrepreneur looking to brand your business, a student putting together a standout presentation, or an aspiring creative wanting to build a foundation in digital design, Canva has revolutionized how the world creates visuals.
Gone are the days when you needed a degree in graphic design or expensive, complex software to build professional-grade assets. Today, Canva’s intuitive interface makes design accessible to everyone.
This comprehensive, step-by-step guide walks you through everything you need to know to go from absolute beginner to confident Canva designer in 2026.
Table of Contents
- Getting Started: Setting Up Your Account
- Navigating the Canva Dashboard
- Choosing Your Canvas & Dimensions
- Mastering the Editor Interface
- Working with Text, Elements, and Media
- Leveraging AI Tools & Smart Features
- Downloading, Exporting, and Sharing Your Work
- Essential Design Principles for Beginners
1. Getting Started: Setting Up Your Account
Before you can create, you need a workspace. Setting up Canva takes less than a minute:
- Head over to Canva’s website or download the mobile app on iOS or Android.
- Click Sign up in the top right corner.
- Register using your Google account, Apple ID, email, or social logins.
- Choose your account type (Personal, Small Business, Student, Teacher, etc.). This helps Canva customize your dashboard recommendations.
Free vs. Pro: Canva offers a robust Free plan that includes hundreds of thousands of free templates, stock photos, and graphics. However, if you want access to premium stock libraries, the Brand Hub, background remover, and advanced AI-generation tools, you can upgrade to Canva Pro or Canva for Teams.
2. Navigating the Canva Dashboard
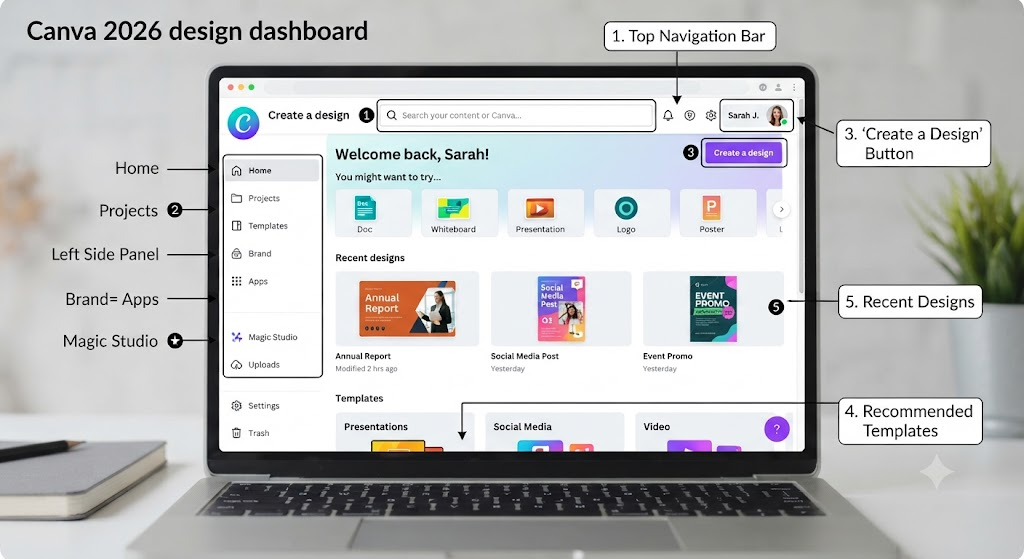
Once you log in, you’ll land on the home dashboard. Think of this as your central creative hub. Here is a quick breakdown of the main sections:
- The Search Bar: Located right at the top. Type in anything you want to create (e.g., “YouTube thumbnail,” “real estate flyer,” or “minimalist resume”), and Canva will instantly generate hundreds of relevant templates and dimensions.
- The Left Sidebar:
- Home: Returns you to the main dashboard.
- Projects: Where all your saved designs, folders, and uploaded files live.
- Templates: A curated library to browse by category.
- Brand Hub: Store your brand logos, color palettes, and fonts for consistency.
- Apps: Explore third-party integrations (like AI image generators and QR code makers) that plug directly into Canva.
3. Choosing Your Canvas & Dimensions
One of the biggest hurdles for beginner designers is figuring out what size a design needs to be. Canva removes this guesswork entirely.
- By Preset: Click Create a design in the top right corner. You’ll see a drop-down list of popular formats—Instagram Post, Presentation, Document, Video, and more. Selecting one opens a canvas pre-sized to exact industry standards.
- Custom Dimensions: If you have specific print or web requirements, click Custom size at the bottom of the Create a design menu and enter your exact width and height in pixels, inches, millimeters, or centimeters.
4. Mastering the Editor Interface
When you click on a design or template, the Canva Editor opens. It is split into three main areas:
- The Top Menu Bar: Displays file settings, resize options, version history, and the Share/Download button.
- The Left Sidebar (Toolbox): Your toolkit for adding ingredients to your design:
- Design: Browse templates for your current canvas.
- Elements: Search for shapes, graphics, stickers, photos, audio, charts, and frames.
- Text: Add headings, subheadings, body text, or trendy pre-paired text combinations.
- Uploads: Upload your own images, videos, or audio files from your device.
- Draw: Use digital pens and highlighters for freehand sketching.
- The Canvas (Center): Your workspace where your design comes to life. Click on any element on the canvas to edit, resize, reposition, or delete it.
5. Working with Text, Elements, and Media
Designing is all about arrangement. Here is how to handle the core building blocks:
Text
- Click Text on the left sidebar and choose a text box style.
- Use the floating toolbar above the canvas to change fonts, adjust font size, alter text color, change alignment, or add effects like shadows and neon glows.
- Pro Tip: Stick to a maximum of two or three complementary fonts per design to keep it looking clean and readable.
Graphics & Elements
- Go to Elements and search for icons, shapes, or illustrations.
- Drag and drop elements onto your canvas. Use the corner handles to resize them, and the rotation handle to tilt them.
- Frames and Grids: Look for “Frames” in the Elements tab. If you drag a photo into a frame, it will automatically crop itself into that shape (circles, laptops, polaroids, etc.).
Media Uploads
- Easily drag and drop images or videos from your computer directly onto the Canva canvas.
- Click an image and select Edit Photo to access tools like Background Remover, smart filters, and adjustments (brightness, contrast, saturation).
6. Leveraging AI Tools & Smart Features
Canva integrates powerful AI and automation features to speed up your workflow and enhance your layouts:
- Magic Design / Text to Image: Type a prompt into Canva’s AI tools to instantly generate custom images or layout suggestions based on your input text.
- Magic Write: Need copy for a presentation or social caption? Use Magic Write (Canva’s built-in AI copywriter) to draft text right inside your document or design.
- Brand Templates: If you work with a team, you can lock certain elements of a design as a template so others can swap out text and images without breaking your visual guidelines.
7. Downloading, Exporting, and Sharing Your Work
Once your masterpiece is complete, it’s time to export and share it:
- Click the Share button in the top right corner.
- Download: Choose your preferred file format:
- PNG or JPG: Best for social media posts, graphics, and images.
- PDF Standard / PDF Print: Best for documents, multi-page reports, and flyers.
- MP4 Video or GIF: Best for animated graphics, reels, and video presentations.
- Collaborate: You can also invite team members or clients to view, comment on, or edit the design in real-time by entering their email addresses.
8. Essential Design Principles for Beginners
To wrap up your journey into Canva design, keep these golden rules in mind:
- Whitespace is your friend: Don’t cram every corner of your canvas. Leaving empty space lets your important text and visuals breathe.
- Establish a visual hierarchy: Make your main headline the largest element so the viewer’s eye knows where to look first.
- Maintain contrast: Ensure your text color stands out sharply against your background. Dark text on a light background (or vice versa) ensures maximum readability.
Recommended Reading
Continue exploring Canva and content creation with these Skilswave articles:
- 25 Canva Tips Every Affiliate Marketer Should Know about
- How to Create High-Converting Pinterest Pins with Canva
- How to Design Professional Lead Magnets Using Canva
- Canva Free vs Canva Pro: Which Should You Choose?
- Best Canva Templates for Bloggers and Affiliate Marketers
- Your One-Stop Canva Learning Hub
Ready to Unlock Canva’s AI-Powered Workflow?
Start experimenting with one Magic Studio feature at a time. As your confidence grows, combine these tools to create faster, maintain a consistent brand, and produce professional-quality content that supports your blogging, affiliate marketing, and online business goals. Explore more Canva tutorials and practical guides in the Skilswave Canva Resource Center.
You’re now ready to jump into Canva and start creating! Fire up your dashboard, experiment with a template, and let your creativity flow. Happy designing!